


You don't need a bunch of expensive equipment to get a beautiful, glossy finish on a stone. In fact, all it really takes is a little bit of elbow grease and the right hand-sanding technique. This process uses progressively finer grits of wet/dry sandpaper to smooth and shine a stone, transforming it into a personal keepsake or an incredibly thoughtful gift. The real key here is patience—and following a methodical approach to get the surface just right. The end result is a stunning, high-touch item perfect for a client gift or a personal memento.
The Timeless Art of Hand Polishing Stones
When you learn how to polish stones without a tumbler, you're connecting with a craft that’s thousands of years old. This hands-on process turns an ordinary rock into a real treasure, perfect for creating memorable corporate gifts or personal mementos. There's a unique satisfaction in turning a simple stone into something special, like a custom set of whiskey chilling stones that look incredible next to an elegant decanter from a curated gift set.
This isn't some new-fangled DIY hack. Long before electric tumblers were even a thought, people were polishing stones with nothing more than simple abrasives and a whole lot of patience. Archaeologists have found ground and polished stone tools dating back 10,000 to 7,500 years ago. These were made by simply grinding one stone against another using sand and water as an abrasive.
From Rough Rock to Polished Gem
This bit of history just goes to show that getting a smooth, glassy finish is totally achievable at home. It's a meditative and rewarding process, giving you a real, tangible connection to your work. Each finished piece tells a story of care and effort, which is what makes it such an exceptional gift. To really see what’s possible, just look at the incredible detail on a piece like this hand-polished chalcedony slice.
Going the hands-on route offers some pretty cool benefits:
- Complete Control: You get to dictate the final shape and finish of the stone, every step of the way.
- Deep Satisfaction: There's a profound sense of accomplishment in creating something beautiful entirely by hand.
- Thoughtful Gifting: Hand-polished stones make for incredibly personal, high-touch gifts for clients or loved ones. If you're curious about the gifting angle, you might be interested in the real story behind what we know today as whiskey stones.
Think of this guide as your go-to resource for mastering the art of hand-sanding, empowering you to create some truly beautiful pieces from scratch.
Gathering Your Essential Polishing Toolkit
Before you can turn a rough, ordinary stone into a gleaming masterpiece, you’ve got to get your gear in order. Having everything laid out and ready to go makes the entire process so much more enjoyable and lets you focus on the art of it. Think of it like a chef's mise en place—every component is critical for that perfect result.
Your setup will shift a bit depending on whether you’re going old-school with hand-sanding or powering up with a Dremel, but the core idea is the same. You're aiming to create a stunning, personalized piece that really shows your attention to detail. This is the first step toward crafting something truly special, like custom-polished whiskey stones paired with a set of elegant glasses for a memorable corporate gift. Our premium gift sets are a perfect example of how beautifully polished stones can elevate a gift.
The Hand-Sanding Essentials
For the traditional hand-sanding route, your tools are beautifully simple yet incredibly effective. This method is perfect if you’re working on a small batch or just want to get lost in a more meditative, hands-on process.
- Non-Porous Stones: These are the star of the show! You'll want to find hard, dense stones like granite, basalt, or even smooth river rocks. These types are perfect for chilling drinks because they won't absorb any flavors or odors from the whiskey. If you want to dive deeper into stone selection, check out our guide on what whiskey stones are made of.
- Wet/Dry Sandpaper: The key here is progression. You'll need a range of grits, starting with something coarse like 220 to shape the stone. From there, you'll move to a medium 400-600 grit for smoothing things out, and finally, work your way up to fine grits like 1200 and 2000 for that pre-polish finish.
- A Shallow Tray of Water: Don't skip this. Keeping your sandpaper and stone wet is crucial. It acts as a lubricant, keeps dust down, and makes your sandpaper last a whole lot longer.
- Soft Cloths: A few of these are a must-have for the final buffing stage once you introduce your polishing compound.
Safety First: Always look out for yourself. Pop on some safety glasses to protect your eyes from any flying rock chips, and wear a good pair of waterproof gloves to keep your hands safe during all that wet sanding.
Upgrading Your Setup with a Dremel
Got a bigger project in mind? If you’re creating a whole batch of polished stones for a corporate event or as gifts for multiple clients, a Dremel or other rotary tool will be your best friend. It saves a massive amount of time and delivers precision without sacrificing that handcrafted quality. This efficiency is key for corporate buyers looking to create unique, branded gifts at scale.
To gear up for the Dremel method, you’ll add a few more things to your list:
- A Dremel or Rotary Tool: Look for a model with variable speed settings. That control is everything.
- Sanding Drum Attachments: These little guys do the heavy lifting. You'll get them in grits that correspond to your sandpaper progression to handle all the shaping and smoothing.
- Felt Polishing Wheels: These are for the grand finale. You’ll use them with a polishing compound to work up that brilliant, high-gloss shine.
- Polishing Compound: A product like cerium oxide or tin oxide is what you’ll apply to the felt wheel. It’s the secret ingredient that brings out that incredible, glass-like luster on the stone’s surface.
Essential Toolkit for Tumbler-Free Polishing
To make sure you have everything you need before you start, here's a quick-glance table breaking down the toolkit for both methods. This ensures any gift you create, whether for a single person or a large corporate event, has a professional and polished finish.
| Item | Purpose | Hand-Sanding Method | Dremel Method |
|---|---|---|---|
| Non-Porous Stones | The raw material for your project | ✔️ | ✔️ |
| Wet/Dry Sandpaper | For progressive sanding (220 to 2000+ grit) | ✔️ | |
| Dremel/Rotary Tool | For automated shaping and polishing | ✔️ | |
| Sanding Drums | Dremel attachments for initial shaping | ✔️ | |
| Felt Polishing Wheels | Dremel attachments for final polishing | ✔️ | |
| Polishing Compound | To create a high-gloss, final shine | ✔️ | ✔️ |
| Shallow Water Tray | For lubricating the surface during sanding | ✔️ | ✔️ |
| Soft Cloths | For buffing and cleaning | ✔️ | ✔️ |
| Safety Glasses | Eye protection from debris | ✔️ | ✔️ |
| Waterproof Gloves | Hand protection during wet sanding | ✔️ | ✔️ |
Having these items on hand ensures you’re ready for a smooth, successful polishing session, no matter which technique you choose.
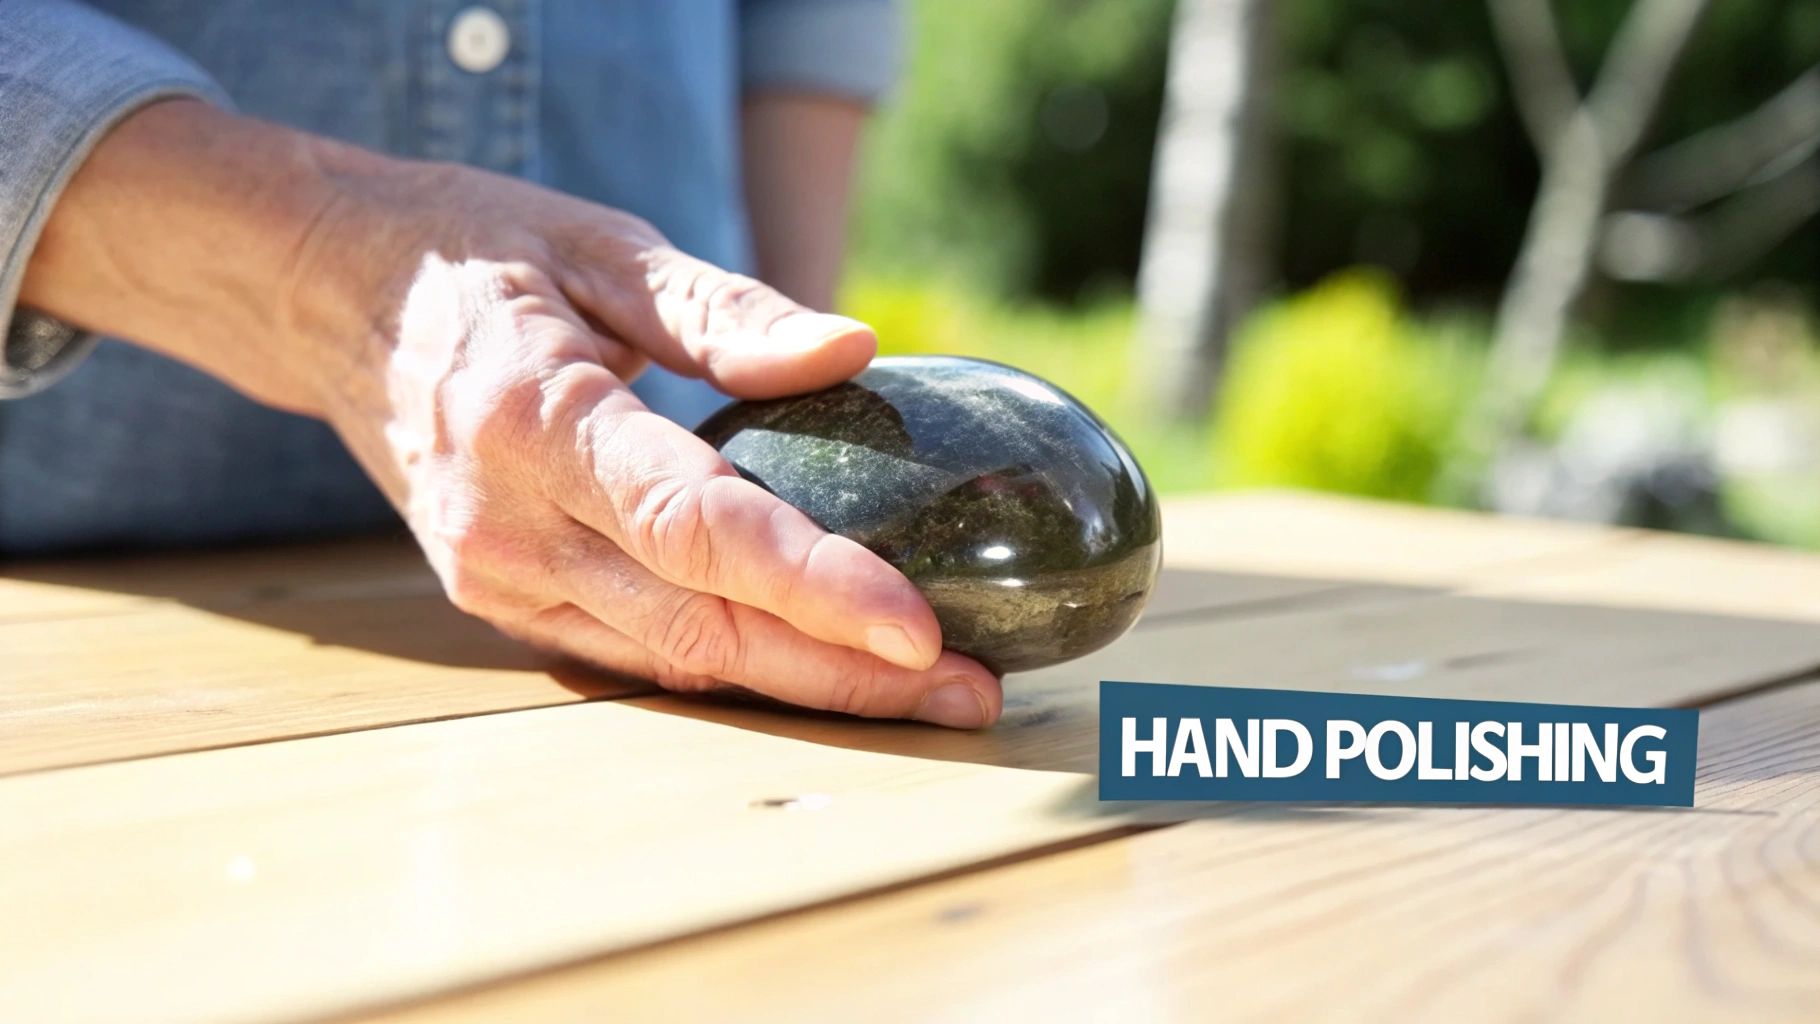
Mastering the Hand Sanding Method
This is where the real work—and the real satisfaction—begins. Hand sanding is more than just a technique; it’s a tactile process that puts you in direct contact with the stone's transformation. You can literally feel the rough spots smoothing out under your fingertips, creating a warm, organic finish that machines often struggle to replicate.
The beauty of this method is its simplicity and the incredible control it gives you. Every pass of the sandpaper lets you shape and refine the stone with intention. This meticulous approach is perfect when you're crafting a high-end, personal gift like a set of custom whiskey chilling stones. The care you put in is obvious in the final product, turning a simple stone into a memorable client appreciation gift or a treasured personal item.
This visual guide breaks down the simple, effective progression from a raw stone to a polished gem using just your hands and some sandpaper.
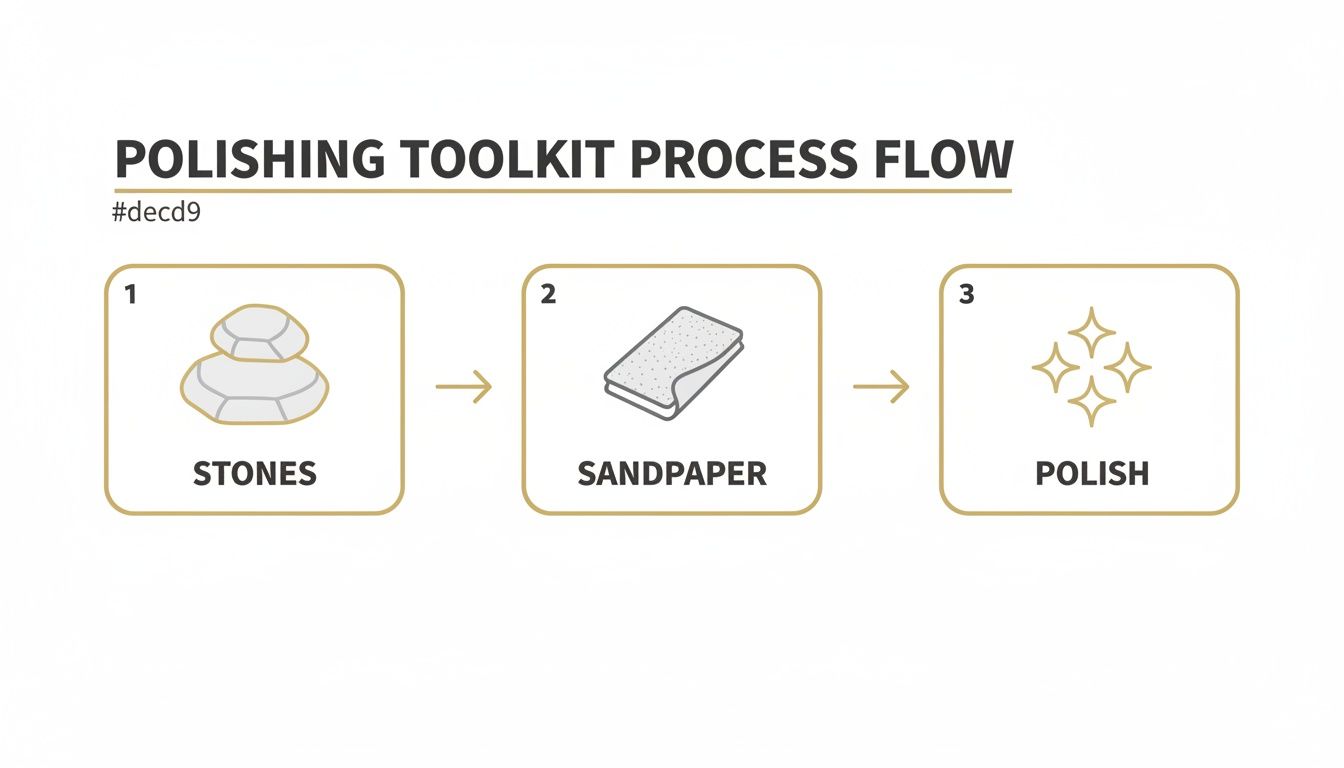
As you can see, the core process is stripped down to its essentials: the stone, an abrasive, and the final polish. That’s all you need to get stunning results without a shop full of equipment.
The Art of Grit Progression
The secret to a flawless, glass-like finish is patiently working your way up through sandpaper grits, from coarse to ultra-fine. You absolutely cannot rush this. Each stage meticulously prepares the stone for the next, erasing the scratches left by the previous grit. Think of it like painting—you need a perfectly primed canvas before you can add the fine details.
Modern lapidary research backs this up. The fundamental principle of stone polishing, whether in a pro workshop or on your kitchen counter, is the controlled application of increasingly finer abrasives. A professional might shape a stone with 220 and 600 grit laps, pre-polish with 1200, and finish with grits as high as 50,000 for a mirror shine.
For our purposes—crafting handsome, non-porous whiskey stones—we can mimic this same process with wet-dry sandpaper. A progression like 240 → 600 → 1000 → 2000 effectively achieves the same goal at a minimal cost. If you want to dive deeper into the science, you can read more about the controlled use of abrasives in lapidary work.
Your Step-by-Step Hand Sanding Guide
Ready to get started? Here’s a breakdown of the process that will take you from a rough rock to a satin-smooth stone ready for its final polish. Creating a gift by hand speaks volumes, and this method ensures a personal touch every step of the way.
-
Start with Coarse Grit (220-400): Get your coarsest sandpaper and submerge it in a shallow tray of water. Place the wet paper on a flat, stable surface and begin rubbing your stone against it in a circular or figure-eight motion. This first stage does the heavy lifting, knocking down the high spots, removing deep imperfections, and establishing the basic shape.
-
Move to Medium Grit (600-800): Once the stone feels uniformly smooth and all major flaws are gone, it's time to move up. Make sure you thoroughly rinse the stone to get rid of any grit from the previous stage—you don't want those coarse particles scratching your newly refined surface. Repeat the wet sanding process, applying consistent, even pressure.
-
Refine with Fine Grit (1000-2000+): This is where you start to see a real sheen emerge. After another good cleaning, switch to your fine-grit sandpaper. The surface will start to feel silky and develop a subtle luster. The scratches are now becoming so fine that you can no longer see them with the naked eye.
Pro-Tip: How do you know when to switch grits? The visual cue is a uniform, matte finish across the entire surface. If you hold the stone up to a light and see inconsistent scratch patterns or deeper gouges from the prior sandpaper, spend a little more time on that stage before moving on. Patience here pays off big time in the final polish.
Bringing in the Power: Polishing with a Dremel
If the slow, meditative rhythm of hand-sanding just isn't cutting it for you, or if you're looking to make more than one or two stones, it's time to bring in a Dremel. A good rotary tool is a total game-changer, turning hours of work into minutes and giving you incredibly consistent, professional-looking results.
This is my go-to method when I'm creating a whole set of custom whiskey stones for a gift, or maybe even a larger batch for a corporate order. It’s the perfect middle ground between painstaking hand-polishing and investing in a full-blown tumbler. You still get a ton of control over the final shape and finish, but with a massive boost in efficiency, which is ideal for corporate gift buyers.
What You'll Need for Rotary Polishing
To get started, you'll need your Dremel tool and a few key attachments. The idea is to basically replicate the grit progression you'd use for hand-sanding, but let the tool do the heavy lifting.
- Sanding Drum Attachments: These are your workhorses for the first few stages of shaping and smoothing. You’ll want a variety of grits, starting with a coarser 220-grit, moving to a medium 600-grit, and finishing the sanding stage with a fine 1200-grit.
- Felt Polishing Wheels and Cones: Once the sanding is done, you'll switch to these soft attachments. You load them up with a bit of polishing compound, and they'll buff your stone to that brilliant, high-gloss shine you’re after.
- A Secure Vise or Clamp: This is crucial. Unlike hand-sanding, you’ll be holding the Dremel and moving it over the stone. A small, padded bench vise is perfect because it holds the stone steady without scratching the surface.
When you're making a set of something like custom barware, consistency is everything. Using a Dremel ensures every single stone has that same uniform, high-quality finish, just like the items in our premium product assortment.
Work Smart, Work Safe
The speed and power of a rotary tool mean you need to be a little more careful. Since that bit is spinning incredibly fast, you absolutely must secure the stone. Seriously, don't skip this. A stone that gets away from you can become a dangerous projectile. Always clamp your workpiece down before you even turn the tool on.
Pro tip: Always wear safety glasses. Rock chips and dust will fly, and you don't want any of it near your eyes. I also like to keep a small bowl of water nearby to dip the stone in every so often. This keeps it cool, prevents heat from cracking the stone, and keeps the dust down.
Kick things off with your coarsest sanding drum and set your Dremel to its lowest speed. You want to use light, even pressure, and keep the tool moving across the surface. If you stay in one spot for too long, you’ll end up with ugly flat spots or even burn marks.
Move through your grits one by one, from coarsest to finest, just like with hand-sanding. Make sure you rinse the stone off completely between each grit change to get rid of any leftover particles. By the time you’re done with your finest sanding drum, the stone should feel silky smooth and have a nice, even satin finish, perfectly prepped for that final polish.
Achieving a Lasting, Glass-Like Shine
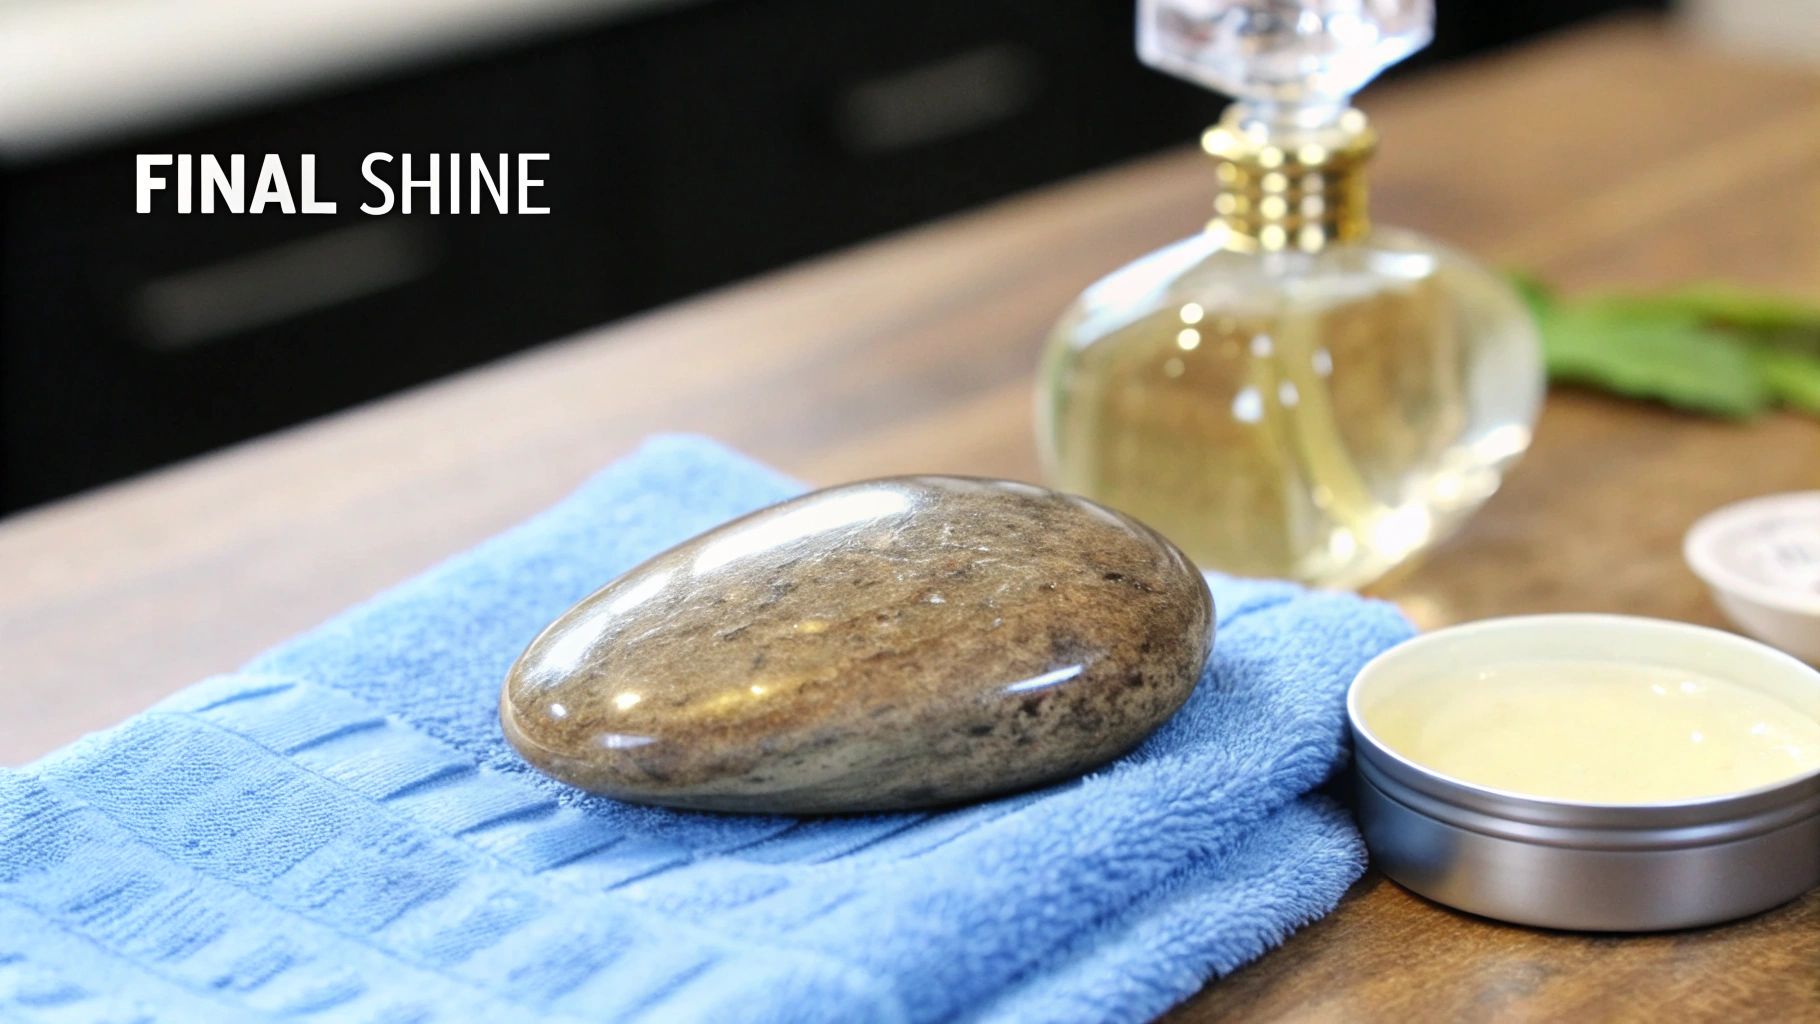
You’ve put in the time shaping and sanding, and now you’re at the final—and most rewarding—stage. This is where your smooth, satin-finished stone transforms into a gleaming gem with that coveted "wet look." It's this last touch that really elevates your project, turning a simple craft into a luxury object worthy of a spot in a premium gift set next to a fine decanter.
The secret to getting that brilliant shine is a good polishing compound. These super-fine powders, when mixed with water, create a paste that buffs out the microscopic scratches left behind by even the highest-grit sandpaper. For most stones, especially ones destined for a whiskey glass, a couple of compounds are the industry go-to:
- Cerium Oxide: Often called "optician's rouge," this is the workhorse for achieving a brilliant, crystal-clear polish on a huge variety of stones. It's incredibly effective and easy to find.
- Tin Oxide: Another fantastic choice. Tin oxide produces an amazing high-gloss finish, and it works especially well on softer stones like marble or calcite.
The Final Buffing Technique
Applying the polish is pretty straightforward, whether you're doing it by hand or using a Dremel. You just need to create a thick paste by mixing a small amount of the polishing powder with water. You're aiming for a consistency like mud or toothpaste—thick enough to stick to your cloth or buffing wheel, but wet enough to work across the stone's surface.
For a hand-buffed finish, just dab a little paste onto a clean, soft cloth (microfiber or felt works great) and rub it into the stone with firm, circular motions. If you're using a Dremel, pop on a felt polishing wheel, apply the paste to the wheel, and use a low-to-medium speed to buff the surface. Just keep the tool moving to get a nice, even finish.
The real magic happens right as the paste starts to dry. You’ll feel a slight drag as you keep buffing, and then suddenly, the surface will transform into a deep, glass-like luster. This is the moment all your hard work pays off.
Critical Cleaning for Food-Safe Results
This final step is absolutely non-negotiable, especially for whiskey stones. Once your stone is polished to perfection, you have to remove every last trace of the compound. Give the stone a thorough scrub under hot, running water using a stiff brush and unscented soap. Really get into any tiny cracks or crevices where residue might try to hide.
Rinse it meticulously until the water runs completely clear and the stone feels squeaky clean. This guarantees it's perfectly safe and ready to chill your favorite spirit without adding any unwanted flavors. This final step ensures your DIY gift is not only beautiful but also practical and safe.
For a deeper dive into keeping your finished pieces looking their best, our guide offers detailed whiskey stone cleaning tips. And if you find the process fascinating, it's worth understanding the intricate process of how professionals polish a diamond to see how they achieve that legendary brilliance.
Answering Your Top Questions About Polishing Stones at Home
Diving into hand-polishing stones naturally brings up a few questions, especially if your goal is to create something truly special and gift-worthy. Getting the right answers from the start is the best way to build confidence and turn a simple rock into a stunning keepsake.
Think of this as your quick-fire guide before you get started. We'll cover the common hurdles so you can focus on creating something beautiful, whether it's for yourself or as a standout corporate gift.
What Are the Best Stones for DIY Whiskey Stones?
When you’re making your own whiskey chilling stones, your choice of rock is everything. You need something hard, non-porous, and fine-grained. These qualities are non-negotiable because they ensure a beautiful polish and, more importantly, prevent the stone from absorbing flavors or leaching anything into your drink.
I always recommend looking for materials like:
- Basalt: A dense volcanic rock that's fantastic at holding its temperature and polishes up to a deep, satisfying shine.
- Granite: It's incredibly durable and gives you that classic, speckled appearance that looks great in a glass.
- Dense River Stones: These are often naturally smooth, which gives you a major head start on the whole process.
On the flip side, you’ll want to avoid porous rocks like sandstone or certain limestones. They can crumble over time and even trap bacteria, which makes them a definite no-go for anything you plan to put in a drink. A little pro-tip: always start with a stone that's already fairly smooth and free of deep cracks. It'll make your life a whole lot easier.
How Long Does Hand-Polishing Actually Take?
This is the classic "how long is a piece of string?" question. The time it takes really boils down to the stone's starting condition and the level of gloss you're aiming for.
As a solid rule of thumb, set aside one to three hours of active work for a smooth, palm-sized river rock. That covers the full journey, from initial shaping with coarse grit sandpaper right through to the final buffing with a polishing compound. The beauty of polishing stones without a tumbler is that you can easily break this up into shorter, more meditative sessions over a weekend.
The most important tool you have is patience. If you rush through the grit stages, you’ll end up with a dull, scratched finish that completely undermines all your effort.
Are DIY Polished Stones Safe for Drinks?
Absolutely, as long as you stick to two golden rules: use the right kind of stone and clean it like you mean it. As we covered, stick to non-porous rocks like granite or basalt to avoid any absorption or contamination issues.
Once you’ve achieved that perfect polish, the final cleaning is critical. You need to scrub the stones thoroughly with soap and hot water to remove every last trace of sanding grit and polishing compound. After a complete rinse, let them air dry, and they'll be perfectly safe to chill your favorite whiskey and add a touch of class to your barware. This ensures any gift you create is safe and of the highest quality.
Can I Use Household Items for a Final Polish?
While nothing beats a professional-grade compound like cerium or tin oxide for a brilliant, mirror-like shine, you can get a decent satin finish with a few things from around the house. A simple paste made from baking soda and water, or even some non-gel toothpaste, can work in a pinch for the final buffing stage with a soft cloth.
But let's be honest—if you're aiming for that true, glass-like professional polish you see in high-end barware gift sets, investing in a proper lapidary compound is the only way to go. It’s what creates that final "wow" factor that makes a gift truly memorable.
At ROCKS Whiskey Chilling Stones, we believe the best gifts come from care and attention to detail. Polishing your own stones is a fantastic way to create something personal, but if you're looking for a complete, ready-to-gift solution, feel free to explore our curated collection of premium barware and whiskey stone sets. Our assortment offers perfect gifting options for any occasion, from client appreciation to corporate events.


